Hamburger Helper’s Cheeseburger Macaroni

Think for a minute about  the many combinations  and permeations of meals that  you can make with  tomato sauce, hamburger,  onion and your choice of starch, vegetables and seasonings.  From chili to tacos to sloppy joes to lasagna.  So many good choices.

One of the dinners I looked forward to as a child  was Hamburger Helper.  It was advertised as a quick meal that your family would love.  It was heavily advertised on TV and so it was something we often asked mom to make. I had believed it was first marketed back to the 1960’s but in researching I discovered it was  first on the market in 1971.

What was it?  Why a meal in a box, almost. In the box was a package of dried noodles and a powdered seasoning or sauce.  Once you browned a pound of hamburger you added the sauce and noodles and some water.  Then just cover for a few minutes and voila dinner was ready.  It made the frugal housewife’s standard protein, hamburger, into something special.  It was said to help stretch a pound of hamburger to feed a family of five.  And at well under a dollar (65 cents when launched) a package helped the inflation hit food budget of the middle 1970’s stretch too.

The company also marketed Tuna Helper and Chicken Helper and offered a variety of different Hamburger recipes as well. Although the cheesy beef varieties were my favourite. I will admit that you really didn’t need to buy the package you could recreate it from your spice rack and a few noodles and sauce.  But it was new and cool when I was a kid.

Children of the 60’s and 70’s may remember the glove mascot for Hamburger Helper called Lefty.  Apparently it scared many young children.   Anyway, if you are too young to remember Hamburger Helper there are many recipes online if you want to make your own Hamburger Helper from scratch, minus all the chemicals in the original.  It seems you can still find Hamburger Helper in stores today if you want to try it.

Sloppy Joes Drippy But Delicious

Sloppy Joes are a rich, tomatoey, drippy puddle of deliciousness  all on a squishy white flour hamburger bun. You had to eat it with a knife and fork at my house but if your mom didn’t care about keeping the tablecloth clean as much as mine did you might be able to hold it and eat it.  Even so you might want a napkin tied around your neck they are that drippy.

When I was a kid my mom sometimes bought the can of Manwich Sloppy Joe mix, especially if it was on sale,  but usually made her own version from the canned stewed tomatoes she had preserved the summer before.  This was a common dinner for my husband and I when first married because it is a quick and satisfying dinner for working people to prepare when starving.   This is another very forgiving recipe that works well with leftovers and can goods you probably have in your pantry. It is a great way to use up slightly stale bread or buns.  I have made it with the store bought can of sauce but also from scratch.  I’ve even used a packages of taco or chili seasoning, or added hot sauce or BBQ sauce for a spicy variation.

Ingredients:
1 pound lean ground beef
1/2 onion diced
1/2 bell pepper diced
1/2 tsp cumin
1 tsp garlic powder
1 1/2 cup of bottled tomato sauce
salt and pepper to taste
6 soft white hamburger buns

Directions:
Saute the beef, onion, pepper and seasoning in a frying pan until the vegetables are softened about 10 minutes. Be sure the meat is broken into small pieces.  Add the tomato sauce blend well and check the level of seasoning. Cook for another 5 minutes or so until thickened. Serve on toasted hamburger buns.

Are you a knife and fork person or do you like the drippy mess of picking it up like a sandwich?

Tuna Noodle Casserole, Not Really A Surprise

Update: I found a 1955 Good Housekeeping magazine at a thrift store this week. And to my delight but not surprise,  it had not one but two recipes for tuna casserole.  One was just like the recipe below except served with whole potato chips on top.  The other was made with tuna and macaroni. While I knew it was a mid- century favourite it is nice to have the proof in ink.  -B  

This is another dish that baby boomers will remember well.  Often called Tuna Noodle Surprise by some but really it was  never that much of  a surprise. Tuna and egg noodles were cheap, fast  and easy to cook.  This dish was exactly the kind of thing housewives were encouraged to make on a busy day.  It took very little time to prepare and could sit in a warm oven all afternoon.

Perhaps every mother in the mid-century had their own recipe of this.   You can use any meat or protein in place of tuna.  Any noodles or frozen or fresh vegetables will work as long as you cook them first. Some people used another variety of cream soup or topped the casserole with bread crumbs or just cheese. But I like the variation with crushed  potato chips on top. I knew someone who used salt and vinegar potato chips to top her tuna surprise for a zingy, decidedly exotic taste-by mid-century standards anyway.

Ingredients:
2 cups cooked egg noodles
1 can of tuna drained
1 can of cream of mushroom soup
milk to fill 1/2 soup can
I cup canned peas drained
1 cup grated cheese to top
2 cups of potato chips crushed to finish

Directions:
Preheat oven to 400 degrees F.  Mix together cooked noodles, soup, tuna, veg and milk in a 2 or 3 quart casserole dish. Bake for 30 minutes, remove from oven then stir.  If adding cheese place it on top as soon the dish has been removed from oven.  Finally spread a thin layer of crushed potato chips on top just before serving.

Oh, I just thought about why it may have been  called surprise. Because the recipe is so adaptable and open to substitutions its ingredients might be a surprise every time. Maybe the surprise in the tuna noodle surprise would be that it sometimes contained chicken, macaroni and lima beans. Mom  may have made it from whatever was “on special” at the grocery store that week.

Pigs In A Blanket

This is a very mid-century snack as it is a quick meal idea made from prepared or processed food that takes less than 20 minutes. It was a favourite from my childhood. It is as delicious and comforting as a grilled cheese sandwich only more so.

The term ‘pigs in a blanket” means different things in different eras.  Some are recipes for pancakes wrapped in bacon. Other recipes use vienna sausages, cocktail weiners or smaller chunks of hotdog. Some recipes suggest keeping the hotdog intact and wrapping the cheese slice,  bacon and dough around the whole hotdog.  In a 1950’s cookbook “pigs in a blanket” sliced into bite sized pieces are suggested as a classy appetizers for  a dinner party.  In a 1930s cookbook “pigs in a blanket” is the name of  a recipe of an  oyster wrapped in a strip of bacon. The recipe below is decidedly more middle class, mid-century in flavour and more kid friendly than oysters!

Ingredients:
1 can (tube) of Pillsbury (or other prepared) crescent rolls
8 hotdogs (or veggie dogs)
8 slices of cheese (processed or cheddar)
8 slices of well cooked bacon

Directions:
Preheat oven to 400 F. Open the can of crescent roll dough and pull each piece apart. Take each hotdog and cut vertically down the middle. Cut up and place the cheese into the opening in the middle of the hotdog. Place the bacon on top of the cheese stuffed hotdog. Finally, wrap the whole thing in a dough piece, starting with the big end of the dough triangle. You will need to stretch the dough to cover the hotdog end to end. Pinch the dough where it meets at the end of the triangle in order to keep the dough together. Place the pigs in a blanket on a greased baking sheet and bake for 10 minutes until the dough is golden brown.  Enjoy with ketchup and mustard.

Mid-century Versus Modern Cost of Living

It is easy to think the mid-century era was a golden age with a booming economy and low prices for food, cars, housing and clothing.  Perhaps the most enviable statistic of all is that a three  bedroom bungalow sold for an average of $11, 000 in 1955.  You can’t buy a dog house for that in 2023.  So let’s look  at  price information from then and  now to see if it really was a golden age.

Below is a chart that shows my research for the 1955 price of comparable items , the price adjusted for inflation to 2023 dollars,  and the actual 2023 prices I found online today.

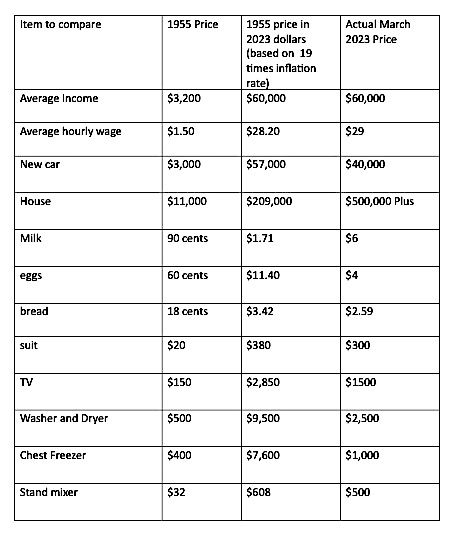
Most families had only one income from the “man of the house”. The average family income was about $3,200 per year.  In 2023 the average income is $60,000 per year.  That is about a 19 times inflation rate and so I have used that rate to compare prices.  However, not all prices across the board  have increased 19 times and  some have increased very much less than that.

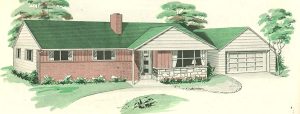
Since a house is usually the biggest item a family will purchase let’s look at housing costs in 1955.  The average house price was $10,950 and interest rates were 4.5 per cent. This would mean a $70 monthly mortgage payments over a 25 year period.  The mortgage payment took one week’s pay cheque per month. In 2023 dollar terms  adjusting for inflation we might expect the cost of the average house to be about $200,000 today.  Alas, in my part of the world it is more like to $500,000 or more.  That means in 2023 a new homebuyer would have a monthly mortgage payment of about $2500 per month  over 25 years.  That is half of the average worker’s monthly income in 2023.  Compare that to about a quarter of the 1955 monthly income.  This math alone shows why it is so much more difficult for a young person to buy a house today than in the mid-century.  Even a two income family would struggle with the mortgage for a new family home.  No Zoomer or Millennial bashing here.  When it comes to buying a house the playing field is not at all the same in 2023.

New suburbs were built everywhere after the second world war and were considered  the ideal family home.  But this also meant that a reliable car was needed to get to work. The average cost of a new car in 1955 was $3000. Assuming the same 4.5 % interest rates over a 5 year repayment loan, the car payments would be $50 per month. This  is almost a week’s wages in 1955 dollars.  No wonder there were few two car families. Translating 1955 prices into today’s dollar, you will find a no frills new car would cost $42,000 with a $700.00 loan payment per month.  That means that in 2023  you could think about being a two car family  as long as you didn’t have a very large mortgage because the car payment would be about three day’s pay- less than in 1955.

In 1955 milk was 90 cents a gallon, eggs were 60 cents per dozen and bread was 18 cents. Sounds great but remember you need to work for an hour to buy milk and eggs. Now, we are all painfully aware that prices have been rising sharply in recent years.  However, I was surprised when I crunched the numbers that food prices were much under what we might expect given the inflation rate from 1955 and today. See the chart above to view the details.

The average wardrobe was very different in the mid-century- we might say uncomfortably formal -with most people wearing suits and hats everyday.   Most men wore suits or uniforms to work.  Most women wore a suit to church or to go to an appointment.  In 1955 a man’s suit cost about $26.  A woman’s summer suit was around $10 and  a winter suit was about $25 with a  blouse around $5.  Most men had two suits  for summer and winter, while a housewife might get away with one good suit for summer and one for winter.  Most women sewed at least some of their clothing and much of their childrens’ as well.  Relatively speaking  the cost for “store bought” clothing was high in 1955.  It would take 30 hours of work to pay for a good quality woollen suit with shirt or blouse.  For comparison, today a decent quality suit from a mall store will cost about $400.  In 2023 it would take about  15 hours of work to pay for it.  Although I will note that based on vintage clothes  both the quality of the fabric and the workmanship of the 2023 suit is likely to be far below  the 1955 suit.  Good quality would be important to mid-century citizens because the 1955 suit had to stand up to many years of wear.  They didn’t think of clothing as going out of fashion in a year or two.  However, you can see in the chart that the price of suits have stayed in line with inflation rates more  than the prices of houses.

One thing that stands out in the chart is the price of household appliances, many of which were new to the market in the 1950’s and quite pricey.  The house proud mid-century homeowners wanted to have the most efficient, beautiful and modern house possible.  The most popular new appliances in 1955 were: a TV  at $150.00, an electric automatic washer and dryer at $500,  and  a stand alone freezer (called a “deep freeze” by my mom) at $400.  A smaller but equally desired appliance was the stand mixer for about $32.  How do the inflated prices match current prices?  Today all of these appliances sell for much less than the price you would could expect based on inflation rates.

The world of manufacturing of has changed in many ways since 1955 and that has affected prices, quality and availability of some consumer goods.  Even without a pandemic to increase prices and decrease supply, globalization has changed where the factories produce  clothing, furniture and appliances and and the materials that are used.   And while there were many mail order catalogues in 1955,  there were also many more department stores in towns and cities so people could shop locally.  Today it is hard to find a well-stocked department store in every town or city and more things are being  supplied  via Amazon or similar suppliers from all around the world..  Anyone who has looked at a 1955 mail order catalogue might lament with me that it is nearly impossible to find a  gorgeous rayon crepe summer suit today anything like those sold everywhere in the mid-century, at any price.

My verdict after looking at all these facts and figures?  Overall, looking back and comparing to today, we made some gains and took some losses.  I would call it a draw overall.  We pay way more for housing, but way less for appliances and food than inflation would predict.  But what remains the same is that any middle class, average family has to work hard and be wise to keep afloat whether in 1955 or 2023. In my opinion there was no golden age in the mid-century.

Why Aprons Were Important To Mid-Century Housewives

When we see pictures of mid-century housewives they always seem to be wearing aprons.   Sometimes the aprons are plain and sometimes they are very elaborately decorated.  Aprons not only looked nice they were important to the mid-century housewife who spent her days tending to the house and family.

Food prep and cooking, as well as cleaning and gardening can be very messy. Since I retired and have been doing  more cooking I have rediscovered that is always better to mess up an apron than your clothes.  Think of oil or tomato splatter on a nice white cotton shirt and how that can turn into a morning of stain removal.  Mid-century housewives were professional homemakers who cooked and cleaned every day and took care of a home and a large family.  They encountered a lot of mess each day.

Mid-century women also had a different attitude towards clothes than we do today.  While the economy was booming after the second world war,  budgets  were tight in most middle class homes.  Many women made their own and their children’s clothing as well as home decor items as that saved a lot of money.   Women wore suits for most trips outside the home.  In 1955 a  woman’s summer suit was around $10 while a winter suit was about $25 and blouses were around $5.  The average 
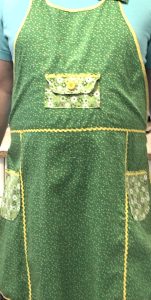
family income was about $3500 or about $1.50 per hour.  It would take 20 hours of work to pay for a good quality woollen suit.   You can see that store bought clothing was relatively  expensive to buy and then perhaps required dry cleaning.  Homemade clothes were a lot of work to make,  then perhaps hand wash and iron.  Either way it took a lot of time or money to get clothes. So people didn’t have a walk in closet full of fast fashion easy care clothing.  They had a much smaller wardrobe and wore their clothes for many more years than we do.  Since much clothing was made from natural fibres like wool and cotton, they had to take more time and care in cleaning their clothes than many of us do today.  There was no convenience of  throwing a load of laundry into the washer and dryer every morning for most housewives at this time. 

Remember that the  electric automatic washers and dryers, liquid detergents and stain removers we have now were not in most mid-century homes.  Many homes still had an old but reliable wringer washer and indoor and outdoor clothesline until well into the 1960s.    Wash day was called that because it could actually  be a full day of work to get the family’s laundry done.  In fact, it usually started the night before wash day, when clothing would be separated into light and dark loads as well as loads that required the same temperature of wash.  Heavily stained or very dirty clothes were soaked in warm water overnight. 

Wash day morning, traditionally on Monday,  may have started with heating water,  grating laundry bar soap,  and adding to it borax and washing soda to create a quite effective laundry detergent.  Next, our mid-century housewife either  washed clothes on a washboard or in  the wringer washing machine.  Washboards were a great way to get grass stains or mud out of clothes.  Wringer washing machines were not automatic in the sense that you put the laundry in and it came out washed, rinsed and spun.  The water often had to be emptied and refilled  manually several times as you ran each of the various cycles.   After rinsing,  housewives then had to ring out or “mangle” the clothes  and hang them  to dry outside on a clothesline or inside on clothes racks in the basement or attic. The wringer attachment was actually very efficient at squeezing out water when the clothing was put through several times.  Dangers of using the wringer were getting your fingers or clothing caught in the rollers and having buttons or decorations on clothing break from the force of the wringer.  My mother’s generation lamented the loss of the wringer because  it did half the job of ironing sheets or pants. The wringer smoothed and “pressed” the clothing as it was squeezed  between the rollers.   Once rinsed and wrung, and hung to dry,  the job wasn’t finished yet. Clothing was  hung to “damp dry” and then had to be ironed.  Even using an electric iron took hours to iron all the clothes, sheets and other linens. Again much of the clothing was cotton, wool and rayon or blends and required ironing. 

Just imagine the  ideal mid-century family of 5 or 6 and the amount of laundry they would create in a week.  Even though people showered or bathed and changed their outer clothes less often than we do today, a family  would still create   a big pile of laundry for the housewife to do.

So coming back to the importance of aprons, they saved time and money for the busy housewife.  They also were a way of fancying  up a well worn dress as you could  make aprons  from of a small piece or scraps of fabric and embellish them with bits of trims, lace, embroidery and so on.   They are relatively simple to sew and when made of a sturdy cotton print can be washed and worn for years.  The photos I have uploaded below are of an apron I made after being inspired by 1940’s aprons.  It is made from vintage thrifted fabric in a “ditzy” flower print.  The contrasting pockets are from a modern remake of a vintage floral print.  The sewing pattern is very simple.  It is just  a single piece of fabric, cut on a centre fold, with rounded bottom edges and a finished halter opening for the head.  I finished the edges around the apron with  seam binding and  added vintage ric rac and button.  The ties are just more seam binding  sewed shut and attached to the sides of the apron.  This pattern is a generous cut to cover up the clothing where splashes and splatters are likely to land when cooking or cleaning.  This is why,  in my opinion,  a  half apron is not worth wearing.  My husband is my apron model just to give him credit.

Someday I will have to blog about house dresses for housewives. That is a whole other story of a largely extinct fashion.


Pineapple Upside Down Cake


This is a classic mid-century dessert. In the late 1940’s and the 1950s housewives were encouraged to use canned, frozen (if they were rich enough to afford a freezer) or prepared food items to make their workload more manageable. This was a time when freezers were new on the market, as were electric stoves and automatic washers. Most housewives did not have these modern conveniences. But they could use canned food items and save themselves the time of cooking ingredients from fresh. The other thing to remember is there was not the food distribution system we have now and getting fresh fruits and vegetables all year long was just not the same as today.

Pineapple Upside-Down Cake

Ingredients:
1/2 cup butter
1 cup brown sugar
1 can pineapple rings, drained
Reserve the juice from the can of pineapple
2 Tbsp nuts (pecans or walnuts work well)
1 store bought white or yellow cake mix

Directions:
Pour melted butter into a large glass cake pan. Spread brown sugar evenly over the butter. You could add cinnamon or nutmeg if desired. Gently place drained pineapple rings over the sugar and butter mixture. You could place maraschino cherries in the middle of the pineapple rings to make the final presentation prettier. Place nuts into the empty spaces between pineapple rings.

Mix the pre-packaged cake mix according to the directions on the box. Use the pineapple juice in place of the liquid suggested by the cake directions. Slowly spoon cake mix over the fruit, being careful not to move the pineapple mixture beneath the cake. Follow the baking direction on the cake box. When the cake is baked, carefully turn the pan over so the pineapple mixture is now on top. Cool before serving. Whipped topping is a good compliment to the cake.

Maple Apple Compote


As a way to use up the last of the apples in the cold cellar and enjoy the sweet treat of maple sugar –  this a vintage recipe. A compote is a slow cooked spiced fruit dish, an old fashioned kind of dessert. My mother often made a strawberry rhubarb version with walnuts and raisins.

Ingredients:
4 apples
1 1/2 teaspoons cinnamon
1 tsp nutmeg
1 tsp ginger
2 Tbsp butter
1/2 c maple sugar or brown sugar

Directions:
Core, peel and chop apple into 1/2 inch pieces. In a large bowl add the spices and stir apple pieces to coat evenly. Set aside the apples.

In a saucepan mix butter and sugar over medium heat. Gradually increase heat, stirring carefully until the mixture comes to a boil, slightly caramelizing it. Cook for 5 minutes watching that it doesn’t get too dark.

Add the apple mixture to the pot and cook for another 10 minutes over medium heat. Watch the mixture, do not let it boil or let the apples break down. Cool before serving. You can can it too.

Compote is great on ice cream, oatmeal, pancakes, yogurt, curry and pork dishes. Enjoy!

Maple Tonic

As the snow melts and the temperatures rise, so does maple sap. I live in an area where it seems every farm has a maple sugar bush and makes maple syrup. This recipe is for a spring tonic, that includes maple syrup.

What is a spring tonic? The idea was that because people’s diets were poor and life was hard over the long hard winter, in the spring everyone needed a “pick me up”. This was usually a homemade herbal concoction rich in vitamins and minerals, frequently with an ingredient to remove parasites. Gross, I know. I did say life was hard in winter.

Mid-century children were given liquid vitamin mixtures long before chewable or gummy vitamins had been invented. I recall being fed a spoonful a day of one with a very orangey flavour, called Pardec, I believe. But I had friends who had more traditional mothers who gave them tablespoons full of cod liver oil in the late winter or spring.

While this recipe isn’t for children, the idea of a tonic seems perfect for this time of year. Enjoy maple syrup at this sweetest time of year.

Maple Tonic

Ingredients:
1/4 cup maple syrup
1/4 cup lime or lemon juice
1 cup light rum
1 cup gin

Directions:
Combine all ingredients and stir or shake well. Pour over crushed ice into liqueur glasses. Garnish with citrus fruit wedges.

I hope this recipe is a tonic to you!

Egg-free Chocolate Chip Cookies

Egg-free Chocolate Chip Cookies

These little cookies are not from a mid century source but they work well for people with egg allergies like my husband. They remind me of my mothers recipe because they are loaded with chocolate chips!

Ingredients:
¼ cup softened butter
¾ cup brown sugar
2 tsp vanilla
½ tsp salt
1 cup all purpose or bread flour
2 Tbsp milk
1 cup chocolate chips

Directions:

Preheat oven to 375 F. In a stand mixer, mix dry ingredients together. Add wet ingredients until combined. Add in chocolate chips. Roll into small balls and squash flat on baking sheet. Bake for 15 minutes or until the edges are browning. This cookie dough is safe to eat raw as well.

>